When I was pregnant with Autumn, I saw lots of photos on the internet of women who had made plaster casts of their pregnant bellies. I thought it would be a lovely reminder of my bump and thought it would be amusing to wear in the future to see how big my bump was, (it was HUGE, I can barely believe it when I place it against myself now). Lots of women online also paint beautiful designs on theirs. Mine is still just plain at the moment, but I’d like to do something with it in the future.
Lots of places online sell kits for doing this and they often retail at around £15, but you can do it much more cheaply! All you need to do is buy some plaster of paris bandage rolls and some petroleum jelly. We managed to get these rolls from our local craft shop for a little over £1 each roll. I’m petite and two rolls just about made a cast of my bump, so for most women I’d probably recommend getting three rolls – you’ve still probably saved about £10!
Things you need:
- Old clothing – preferably underwear you don’t mind throwing away
- Newspapers or other material for covering and protecting the floor
- A bowl of warm water
- Plaster of paris bandage rolls
- Petroleum jelly
- An assistant
Instructions:
-
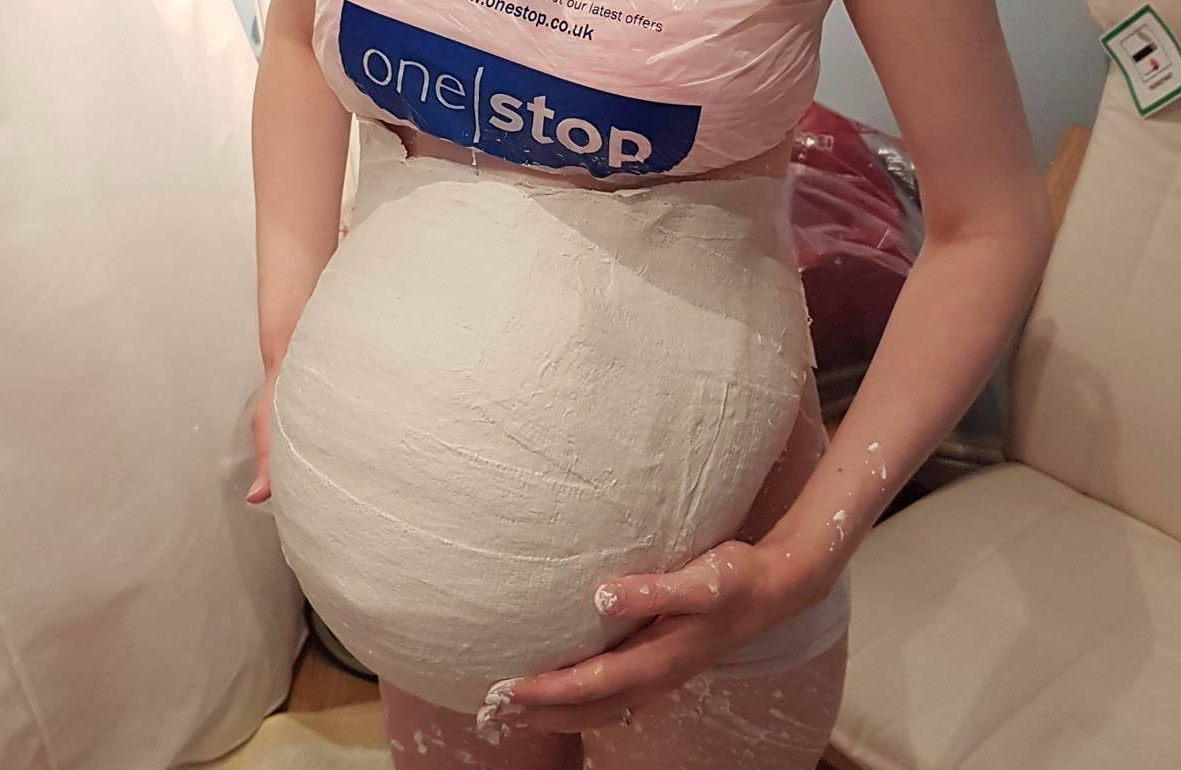
- Step One: Get dressed suitably. I put on some old underwear that I didn’t mind getting covered in plaster and I put a plastic bag on as a kind of crop top, I tucked it in under my bra to protect it from plaster. You may also want to protect the floor – we have rubbish floor which is due to be replaced sometime soon, so we weren’t too worried about it.
- Step Two: Sit in the most comfortable place and position you can (making sure the chair is covered in an old towel). You’re going to have to sit there for quite some time and it’s important that you keep still for the best results.
- Step Three: Prepare your belly and sides by rubbing petroleum jelly all over it liberally. Trust me, if you peel dried plaster off of bits that haven’t had petroleum jelly on them it hurts!
- Step Four: Get a willing person to start applying the plaster bandages! You need to get them a little bit wet and then place them smoothly across the belly, without creases (Dave was worried about this as he isn’t particularly artistic, but he did a pretty good job!)
- Step Five: With each strip you place on, get your finger wet then gently rub your finger over it to make the plaster go smooth, rather than being porous.
- Step Six: Continue doing steps four and five until the whole belly is covered (just look at the concentration!)
- Step Seven: After waiting for 20-30 minutes, carefully stand and remove the cast. Then admire the handiwork!
- Step Nine: Jump in the bath or shower and wash the inevitable bits of plaster off, tidy up and put the cast in a safe place
- Step Ten: After 24 hours, it should be dry enough to paint if you wish. Enjoy!
I made my plaster cast at 37 and a half weeks pregnant, as I wasn’t expecting to get much past 37 weeks (in the end, Autumn was actually born the day before her due date though!) Actually, I had terrible braxton hicks while we were doing this and I was urging Dave to do it as quickly as possible in case I was actually in labour!
Have you made a plaster cast of your bump or are you going to give it a go? Let me know in the comments below!
This post was first seen on www.meetothermums.com
What a great idea! If ever I have another bump I’ll cast it! xx
This is a fabulous idea! I only have one photo of each bump and totally regret it now, making a cast would have been great to remember! Thanks so much for sharing with #Blogstravaganza xx